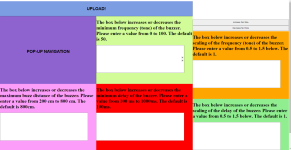
I am trying to write some frontend code for an arduino project and I am trying to fit a div with two buttons in it into the top right of the screen. However, it seems that no matter what I try it wants to go one layer down from the top. How can I fix this?
All of my code:
Here is an example of it not working:

All of my code:
HTML:
<!DOCTYPE html>
<html>
    <head>
        <style>
            .container {
              width: 100%;
              height: 100vh;
            }

            .toppane {
              width: 100%;
              height: 10vh;
            }

            .leftpane {
              width: 33.333%;
              height: 45vh;
              float: left;
            }

            .middlepane {
              width: 33.334%;
              height: 45vh;
              float: left;
            }

            .rightpane {
              width: 33.333%;
              height: 45vh;
              float: right;
            }

            body {
              margin: 0!important;
            }

            .d-flex {
              display: flex;
            }
            button {
              display: block;
              margin: 10px 0;
              padding: 10px;
              width: 100%;
              height: 100%;
            }
            input {
              width: 90%;
              height: 40%;
              type: number;
              font-size:35px;
            }

        </style>
    </head>
    <body>
        <div class="container">

            <div class="toppane" style="background-color: #7d9de3; width: 66.667%"><button style="background-color: #7d9de3; border-color: #7d9de3"><h1>UPLOAD!</h1></button></div>
            <div class="toppane" style="width: 33.333%; float:right; height: 10vh">
                <h1>
                    <button id="increase" style="margin: 0px 0; padding 0px">Increase Text Size</button>
                    <button id="decrease" style="margin: 0px 0; padding 0px">Decrease Text Size</button>
                </h1>
            </div>
            <div class="leftpane" style="background-color: #8e63cf"><button style="background-color: #8e63cf; border-color: #8e63cf" onclick="startPopups()"><h1>POP-UP NAVIGATION</h1></button></div>
            <div class="middlepane" style="background-color: #d1fc97"><h1><label for="FreqPlMn">The box below increases or decreases the minimum frequency (tone) of the buzzer. Please enter a value from 0 to 100. The default is 50.</label></h1><input id="FreqPlMn" name="FreqPlMn" min="0" max="100" type="number"></input></div>
            <div class="rightpane" style="background-color: orange"><h1><label for="FreqScale">The box below increases or decreases the scaling of the frequency (tone) of the buzzer. Please enter a value from 0.5 to 1.5 below. The default is 1.</label></h1><input id="FreqScale" name="FreqScale" min="0.5" max="1.5" type="number" step=".1"></input></div>
            <div class="leftpane" style="background-color: #fc9df9"><h1><label for="Max">The box below increases or decreases the maximum buzz distance of the buzzer. Please enter a value from 200 cm to 800 cm. The default is 800cm.</label></h1><input id="Max" name="Max" min="200" max="800" type="number" step="10"></input></div>
            <div class="middlepane" style="background-color: red"><h1><label for="DelayPlMn">The box below increases or decreases the minimum delay of the buzzer. Please enter a value from 100 ms to 1000ms. The default is 100ms.</label></h1><input id="DelayPlMn" name="DelayPlMn" min="100" max="1000" type="number" step="100"></input></div>
            <div class="rightpane" style="background-color: lightgreen"><h1><label for="DelayScale">The box below increases or decreases the scaling of the delay of the buzzer. Please enter a value from 0.5 to 1.5 below. The default is 1.</label></h1><input id="DelayScale" name="DelayScale" min="0.5" max="1.5" type="number" step=".1"></input></div>
        </div>
        <script>
            function startPopups() {
                let FreqPlMn = prompt("FreqPlMn", "50");
                let FreqScale = prompt("FreqScale", "1");
                let Max = prompt("Max", "800");
                let DelayPlMn = prompt("delayPlMn", "100")
                let DelayScale = prompt("delayScale", "1");
            }
        </script>
        <script>
        document.addEventListener('DOMContentLoaded', (event) => {
            // Select the buttons
            const increaseButton = document.getElementById('increase');
            const decreaseButton = document.getElementById('decrease');

            // Add event listeners to the buttons
            increaseButton.addEventListener('click', () => adjustFontSize(1));
            decreaseButton.addEventListener('click', () => adjustFontSize(-1));

            function adjustFontSize(change) {
                // Select all elements you want to adjust (e.g., paragraphs, divs, etc.)
                const elements = document.querySelectorAll('h1, button, label'); // Add more selectors as needed
                elements.forEach(element => {
                    // Get the current font size
                    const currentSize = window.getComputedStyle(element, null).getPropertyValue('font-size');
                    // Convert the font size to a number and adjust it
                    const newSize = parseFloat(currentSize) + change;
                    // Apply the new font size
                    element.style.fontSize = `${newSize}px`;
                });
            }
        });
        </script>

    </body>
</html>
Here is an example of it not working:

